How to Apply Concrete Stain
From our experience, many customers struggle with the decision of whether to seek out the expertise of professional concrete specialists or to try to do it themselves. Surprisingly, most people that decide to go for it are usually please with the results they get!
The following step-by-step guide will teach you how to apply concrete stain to existing concrete. It’s actually quite easy if you follow these simple steps.
“If I knew how easy it can be to do concrete staining on my own, I would saved my money and had my projects done more quickly. Too bad I didn’t see your guide a decade ago!” – Jon C., EZ Stain Customer
Step 1: Choosing a Color or Colors
At this stage, you probably know what type of concrete surface you’re planning to stain, so it’s time to look over the EZ Stain eco-friendly concrete stains and decide on your color or colors.
Listed below are some factors that will effect the final appearance of your concrete staining job.
Everyone has a different idea of beauty and taste varies as widely as the colors in the rainbow. What is pleasing to the eyes of some may not be to others It’s ultimately up to you to decide which EZ Stain colors will work best for your application. Like the old saying, “beauty is in the eyes of the beholder“ and in this case, the person doing the staining.
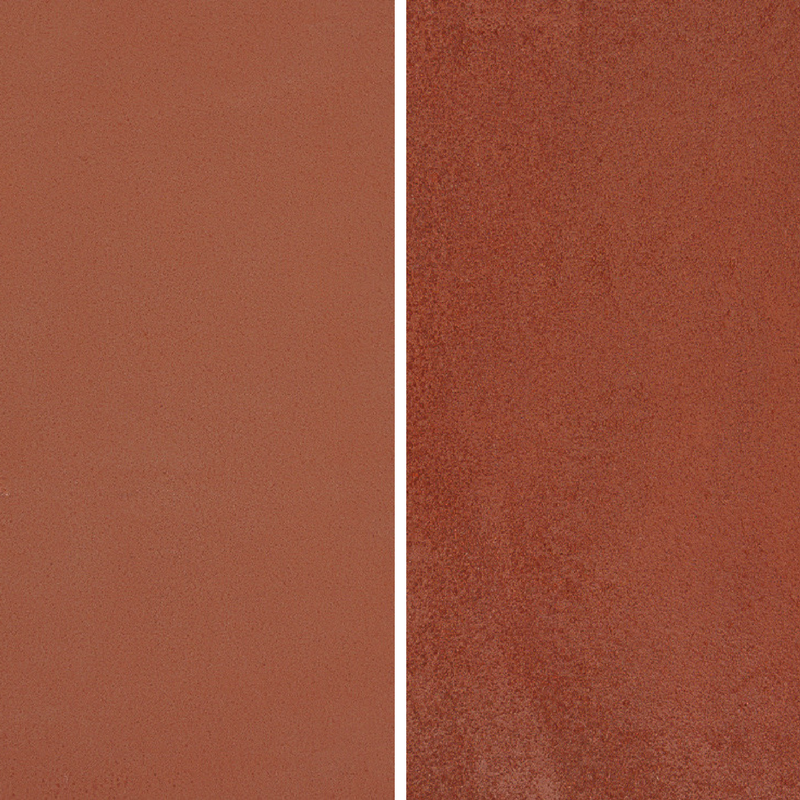
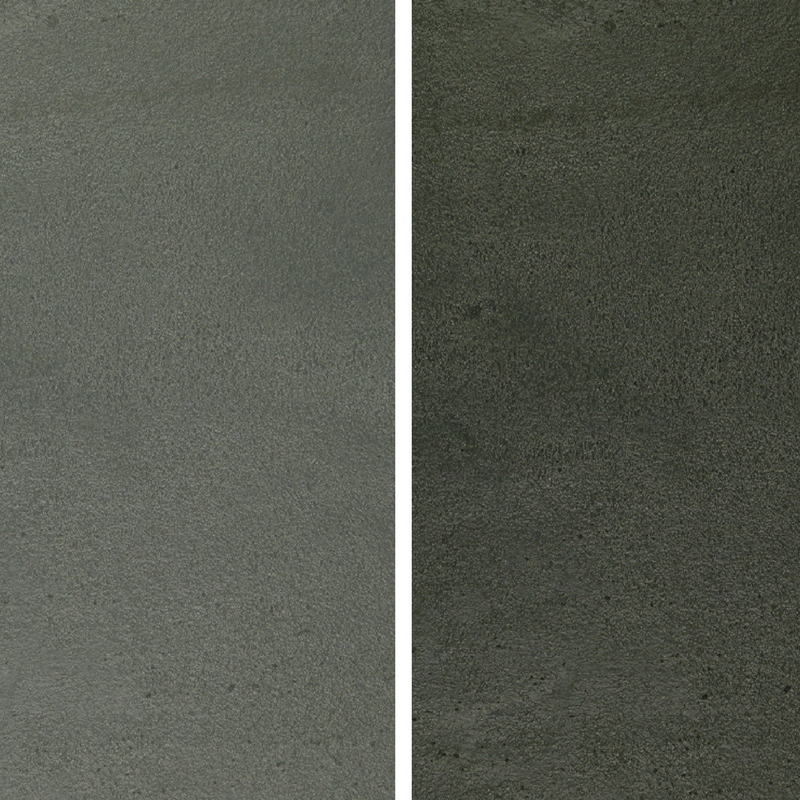
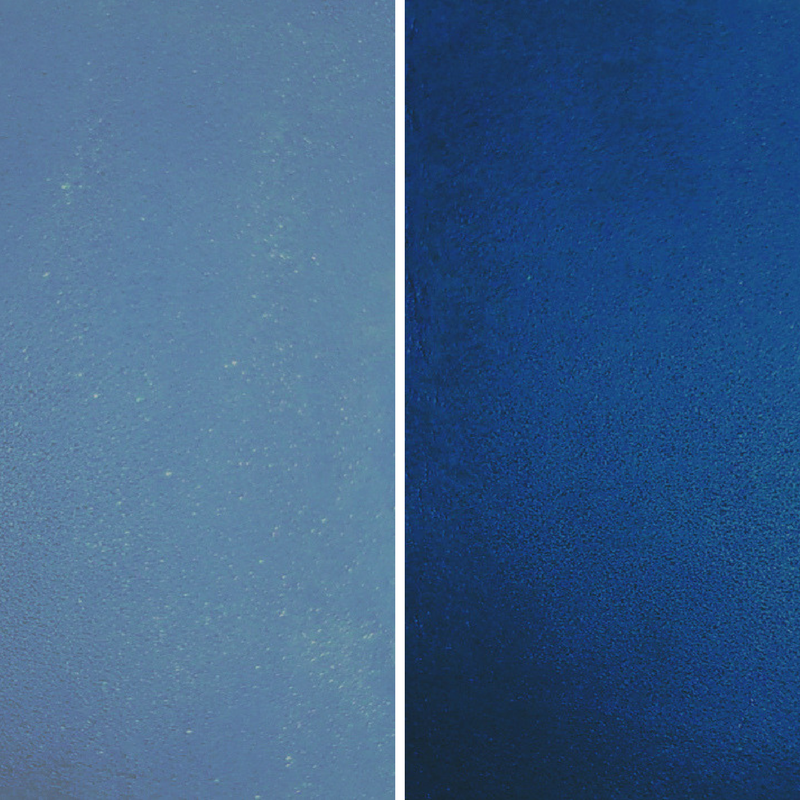
Some people like to see high contrast against other existing colors around the area to be stained, for example a white house with EZ Stain Antique Black used on the porch or patio. While others like similar colors that blend with existing surroundings, like a brick house with EZ Stain Brick Red used on the porch, patio or retaining wall. Often times interior floors are stained to simply coordinate with highlight colors inside the home or building.
Light colors tend to make things look bigger as dark colors tend to make things look smaller.
Areas that are naturally dark or dimly lit generally lend themselves to the lighter colors that will, when stained, appear bigger, brighter and more open. While a big giant concrete retaining wall that seems plain or unsightly, usually appears smaller when stained with a dark color like EZ Stain Antique Black, EZ Stain Chestnut Brown or EZ Stain Mocha.
Decide if your looking for high contrast or not and if your trying to make a space look bigger or smaller or just simply highlighting existing colors then pick out your colors accordingly.
Decide the following:
● If you’re looking for high contrast or not
● If you’re trying to make a space look bigger or smaller
● If you’re simply highlighting existing colors
Then, pick out your colors accordingly.
Multiple colors
The use of multiple colors of our eco stains is a great way to make flooring as well as other surfaces really come to life. It’s simple and just like the name says EZ. One of the most common uses of Multiple colors of EZ Stain are with one color used on large
areas and another used as a border.
Another common and very popular technique in floor staining is the use of multiple coats or layers on top of each other.
While there are really no “Rules”, generally light colors like EZ Stain Limestone Yellow or Desert Tan are applied first as a base and then topped with one of our EZ Stain darker colors as a top layer with great results. Some people like to use our EZ Stain Antique Black as a “sprinkle” coat on top as a third color. More on that when we get to the application section.
OK on to step 2


Step 2: Calculating Square Footage
Square Footage for single color EZ Stain.
Each Quart of EZ Stain Concentrate when mixed at our recommended ratio of 1 part (1 QT) EZ Stain with 3 parts (3 QTS) water will yield approximately 300 Sq feet on average, depending on surface and technique used. Our detailed concrete staining product usage chart will help you to determine how much cleaner, stain and sealer to use on your project.
Square Feet as you know is figured by multiplying length X width for flooring and base X height for walls. For Pottery, Statuary and other surfaces that are irregular and not flat wrap a tape measure around it for width and top to bottom for height.
One thing often over looked when calculating Square Footage, especially with regards to concrete, is not adding the sides. Any sides meant to be stained should be included. NOTHING makes a Stained Concrete job look unfinished, than exposed or visible sides showing that are not uniformly stained like the rest of the area. More on that in Step 5 Application.
Most flat concrete slabs including drive ways, patios, walk ways, etc have a 4 to 6 inch footing all the way around them and this area needs to be included.
After calculating your total Square feet to be stained, multiply your number by 1.1 or 10%. It’s a lot better to have some left over than come up short and not be able to finish your job.
Additional Colors of EZ Stain Sf.
After you have figured out the square footage of your job and you intend to use a base color and a top color you can use this simple formula;
1st color amount of EZ Stain needed = Sq. Feet X .8
2nd color amount of EZ Stain needed= Sq Feet X .6
The reason for this is that you’ll be able to use less EZ Stain on the first color (about 80%) because you’ll want to have light areas that will be covered by your second color. Each additional color(s) will require about 60%, because you don’t want to completely cover up your base or bottom coat.
OK on to Step 3
Step 3: Surface Preparation
Surface Preparation is very important!
Listed below are important Factors that will effect the outcome and longevity of your EZ Stain project.
● First and Foremost surface MUST BE CLEAN & GREASE/OIL FREE, POROUS and NON SEALED.
● Remove ALL Dirt, Grime, Mold, Debris and any and all foreign substance that is not part of the surface to be stained.
● Areas that are very greasy (under the barbecue, car, etc.) should pressure washed and the use of a degreaser is recommended.
OK on to Step 4
Step 4: Mixing EZ Stain Concentrate
If you can mix frozen orange juice concentrate, than you can mix EZ Stain Zero VOC Stain Concentrate. You won’t need anything special just a 1 gallon milk jug or some thing from the recycle bin that holds 1 gallon and has a cap. Make sure it’s clean.
● Shake up your EZ Stain concentrate in it’s shipping container for 20-30 seconds; pour into a container that will hold 1 part concentrate and 3 parts water
Example: if your going to stain 300sqft you’ll need a gallon of mixed concentrate & water.
● Pour shaken 1 quart concentrate into jug, then add 1 quart of water and shake it up again for 10-20 seconds then add 2 more quarts of water give it a couple of shakes and your ready to go. That’s it.
● If Your going to stain a smaller area mix less.
Example: for 100sqft. mix just 10-12ozs of concentrate and 30-36ozs of water.
OK on to step 5

Step 5: Method of Application
EZ Stain can be applied in many ways depending on your desired outcome. Here are the most common methods and what they work well on.
Depending on the surface and it’s size and texture you will have to determine which technique will work best for you.
Always test in a small inconspicuous place first until desired outcome is achieved.
● Spraying works well on concrete floors, driveways, block walls, wood and any large area surface. Spraying works well for solid color applications as well as multicolor applications. Spraying is EZ and Fast and can be done with a pump style or commercial airless sprayer.
● Pouring and Spreading works well on floors, driveways and surfaces that can be broomed or squeegeed and for making patterns or brush strokes. Pouring and a sponge works well when staining statuary.
● Painting/Brushing works well on pottery, statuary and wood, wood fencing. When applying to wood/wood fencing, lightly wet wood. Painting is also very useful for staining the footings of slabs/walkways/driveways (nothing looks worse than a beautifully stained patio with bare concrete spots showing on the sides and footings).
● Dipping works well for small objects with your stain in a bowl. Stir frequently and wear gloves.
● Sponging works well on smooth wood surfaces like plywood/desk & countertops. Wet wood slightly with a mister/spray bottle to open pours, wait 5 min. and use a scotch brite or rough side of sponge to “rub” EZ Stain into the wood and bring out the grain. Following coats if desired should be applied with a soft sponge or brush
OK on to Step 6
Step 6: Multiple Coats and Colors
EZ Stain is made to be used in the artistic layering of floors/driveways/walkways/patios etc. When layering with different colors on each coat you can achieve unique patterns and marbling effects, expressing natural stone and a unique custom look.While there are no strict “rules”.
in using EZ Stain products, here are a few things to keep in mind. Always TEST in a small inconspicuous place first until desired outcome is achieved. Don’t start out doing the whole job… TEST. It’s EZ and it’s fun.
● For multiple colors, generally you will want to put down the lightest color first and let it dry completely. After EZ Stain has dried to the touch you can look back over your job to see if you have any light spots and “tune them up” as desired.
● Once your second coat is finished be sure it’s completely dry before starting your next color.
● Again wet the surface with a light spray/mist. Remember that you have already created a slightly sealed surface with your first coat so this time you’ll be using less water. Water will mostly evaporate and dry and not “soak in” to your slab.
● Apply/spray your second color and use your clear water spray/mist to make marbled effects
● You can start and stop at any time. Just re-wet the area and begin again using your clear water spray/mist to blend or feather you edges of where you previously stopped.
● After all coats of EZ Stain have dried your ready to seal.
OK On to step 7
Step 7: Sealing
What needs to be sealed ? is one of the most common questions.
Any EZ Stained surface that is subjected to high traffic should be sealed; Foot traffic, Car traffic, Dog traffic. Mechanical damage like dragging patio furniture, anything that would leave a mark, scratch or wear concrete will scratch and wear EZ Stain and should be sealed with an appropriate sealer. Sealing your finished EZ Stain job will make it look awesome and last indefinitely with proper maintenance.
Statuary, block walls and other vertical surfaces are often left un-sealed while pottery is usually sealed. Keep in mind, there is nothing wrong with sealing anything, it makes it look great.
PLEASE PLEASE stay away from and do not use cheap home improvement chain store sealers. They don’t work well and WILL RUIN your EZ Stain job by turning into a milky white mess that will basically cover up all of your hard work and will be impossible to remove with out going all the way back to bare concrete. These sealers work fine on plain/bare concrete but are not formulated to work with EZ Stain Products.
We use and recommend our high quality, non-toxic sealing products. To learn more about the types of concrete sealers, check this page. Remember that all coats of sealer should be VERY light coats. Each coat forms another barrier and will bond to itself. 6 light coats are 3 times better that 2 heavy coats, will look better (look deeper) and will last longer.
No products found which match your selection.